Friday 28 October 2016

view your network information ( 100℅ working )

Before you change your IP address and related information, you’ll need to find the full name of the network for the interface you want to change. To do this, type the following command:
netsh interface ipv4 show config
icp_1
Scroll down until you see the interface you’re looking for. In our example, we’re going to modify the Wi-Fi interface, which on our machine is just named “Wi-Fi.” You’ll also see other default names that Windows assigns to interfaces, such as “Local Area Connection,” “Local Area Connection* 2,” and “Ethernet.” Just find the one you’re looking for and make note of the exact name. You can also copy and paste the name to Notepad and then back into Command Prompt later to make things easier.

Change Your IP Address, Subnet Mask, and Default Gateway

With the interface name in hand, you’re ready to change the IP Address, subnet mask, and gateway. To do this, you’ll issue a command using the following syntax:
netsh interface ipv4 set address name="YOUR INTERFACE NAME" static IP_ADDRESS SUBNET_MASK GATEWAY
So, for example, your command might look something like the following:
netsh interface ipv4 set address name="Wi-Fi" static 192.168.3.8 255.255.255.0 192.168.3.1
where the info is replaced by whatever you want to use. In our example, the command does the following:
  • Uses the interface name “Wi-Fi”
  • Sets the IP address to 192.168.3.1
  • Sets the subnet mask to 255.255.255.0
  • Sets the default gateway to 192.168.3.1
And if you’re using a static IP address but want to switch to using an IP address assigned automatically by a DHCP server–such as your router–you can use the following command instead:
netsh interface ip4 set address name=”YOUR INTERFACE NAME” source=dhcp

Change Your DNS Settings

You can also use the netsh command to change the DNS servers used by a network interface. Third-party DNS servers–like Google Public DNSand OpenDNS–can be faster and more reliable than the DNS servers provided by your ISP. Whatever your reason for changing your DNS server, you can do it either at the router so it affects all the devices that get their information from the router or at the individual device. If you want to change the DNS servers for just one PC, it’s easy to do with the netsh command.
You’ll need to use the command twice: once to set your primary DNS server and once to set your secondary, or backup, DNS server. To set your primary DNS server, use the following syntax:
netsh interface ipv4 set dns name="YOUR INTERFACE NAME" static DNS_SERVER
So, for example, your command might look something like the following (in which we set it to Google’s primary public DNS server, 8.8.8.8):
netsh interface ipv4 set dns name="Wi-Fi" static 8.8.8.8
To set your secondary DNS server, you’ll use a very similar command:
netsh interface ipv4 set dns name="YOUR INTERFACE NAME" static DNS_SERVER index=2
So, continuing our example, you might set your secondary DNS as the Google Public DNS secondary server, which is 8.8.4.4:
netsh interface ipv4 set dns name="Wi-Fi" static 8.8.4.4 index=2
And just like with the IP address, you can also change it so that the network interface grabs its DNS settings automatically from a DHCP server instead. Just use the following command:
netsh interface ipv4 set dnsservers name"YOUR INTERFACE NAME" source=dhcp
And there you have it. Whether you like typing at the command prompt better or just want to impress your coworkers, now you know all the command line magic you need for changing your IP address settings.

8 common network utilities explained

Tools like ping, traceroute, lookup, whois, finger, netstat, ipconfig, and port scanners are available on nearly every operating system you can get your hands on. They’re used for everything from troubleshooting a connection to looking up information.
Whether you’re using Windows, Linux, or Mac OS X, these tools are always close at hand. You’ll also find web-based versions of many of these utilities. Some are even available in Chrome OS’s hidden Crosh shell.

ping

The ping command sends ICMP echo request packets to a destination. For example, you could run ping google.com or ping 173.194.33.174 to ping a domain name or IP address.
These packets ask the remote destination to reply. If the remote destination is configured to reply, it will respond with packets of its own. You’ll be able to see how long the round-trip time is between your computer and the destination. You’ll see a “request timed out” message if packet loss is occurring, and you’ll see an error message if your computer can’t communicate with the remote host at all.
This tool can help you troubleshoot Internet connection problems, but bear in mind that many servers and devices are configured not to reply to pings.
ping-command-on-windows

traceroute / tracert / tracepath

The traceroute, tracert, or tracepath command is similar to ping, but provides information about the path a packet takes. traceroute sends packets to a destination, asking each Internet router along the way to reply when it passes on the packet. This will show you the path packets take when you send them between your location and a destination.
This tool can help troubleshoot connection problems. For example, if you can’t communicate with a server, running traceroute may show you where the problem is occurring between your computer and the remote host.
tracert-command-on-windows

ipconfig / ifconfig

The ipconfig command is used on Windows, while the ifconfig command is used on Linux, Mac OS X, and other Unix-like operating systems. These commands allow you to configure your network interfaces and view information about them.
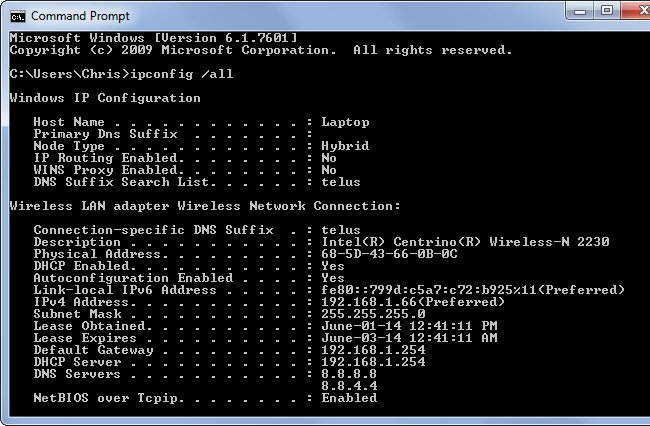
For example, you can use the ipconfig /all command on Windows to view all your configured network interfaces, their IP addresses, DNS servers, and other information. Or, you can use the ipconfig /flushdns command to flush your DNS cache, forcing Windows to get new addresses from its DNS servers every time you contact a new hostname. Other commands can force your computer to release its IP address and get a new one from its DHCP server. This utility can quickly display your computer’s IP address or help you troubleshoot problems.
ipconfig-all-on-windows

nslookup

The nslookup command will look up the IP addresses associated with a domain name. For example, you can run nslookup howtogeek.com to see the IP address of How-To Geek’s server.
Your computer is constantly querying its DNS servers to translate domain names to IP addresses. This command just allows you to do it manually.
nslookup also allows you to perform a reverse lookup to find the domain name associated with an IP address. For example, nslookup 208.43.115.82 will show you that this IP address is associated with howtogeek.com.
nslookup-command-on-linux[4]

whois

The whois command looks up the registration record associated with a domain name. This can show you more information about who registered and owns a domain name, including their contact information.
This command isn’t included with Windows itself, but Microsoft’s Windows Sysinternals provides aWhois tool you can download. This information is also available from many websites that can perform whois lookups for you.
whois-on-linux

netstat

netstat stands for network statistics. This command displays incoming and outgoing network connections as well as other network information. It’s available on Windows, Mac, and Linux — each version has its own command-line options you can tweak to see different types of information.
The netstat utility can show you the open connections on your computer, which programs are making which connections, how much data is being transmitted, and other information.
netstat-b-on-windows

finger

The finger command is old and is no longer widely used. In theory, this command allows you to view information about users logged onto a remote computer. If the computer is running a finger service or daemon, you can use the finger command on your computer to see who’s logged in on that remote computer, their email address, and their full name. In practice, almost no computers are running a finger service you can connect to.
This utility was a cute idea in the early days of networking where you might want to see who was logged into the other few computers on your university network, but it’s not suitable for a dangerous internet. You don’t want people to see your full name and email address when you’re using a computer.
Still, the finger command lives on as a common network utility and is even still included in modern versions of Windows. Windows doesn’t include a finger service that can share this information with others, though.
what-is-finger-command

Port Scan / nmap

The nmap utility is a common tool used for port scans, but there are many utilities that can run this sort of scan. A port scan is the process of attempting to connect to every port on a computer — ports 1 through 65535 — and seeing if they’re open. An attacker might port-scan a system to find vulnerable services. Or, you might port scan your own computer to ensure that there are no vulnerable services listening to the network.
mac-network-utility-port-scan

These aren’t the only network-related commands, but they are some of the most common.

Find your public ip and private ip address of computer

IP addresses can be either public or private. “Public” means an IP address can be reached from the Internet, while “private” means it can’t. For example, in a typical home network, a router has a public IP address on the Internet. The computers, smartphones, game consoles, and other devices behind the router all have unique private IP addresses on the home network. The router acts as an intermediary, forwarding traffic to the local IP addresses that request it. From an outside perspective, all devices on the home network are communicating with the Internet from a single public IP address.
Assuming you’re behind a router performing network address translation, you have two IP addresses that matter. Your computer’s IP address is likely a private IP address, probably starting with 192.168 — is a range of IP addresses specially allocated to private networks. You also likely have a public IP address, which is used when communicating with other computers over the Internet.
image
For example, if you’re hosting a server on your computer, people on the Internet will need the public IP address from your router to connect to your server. People behind your router — on the same local network as your computer — will need the local IP address from your computer to connect.
If your computer is connected directly to the Internet with no router sitting in between, your computer’s IP address is a public IP address.

Finding Your Private IP Address

To find your computer’s IP Address on Windows, open the Control Panel and select View network status and tasks.
image
Click the name of your Internet connection to view its status.
image
Click the Details button in the connection’s status window.
image
You’ll find the IP address listed in the Network Connection Details window – look for the IPv4 Address field
image

A quick way to find your IP address in Windows is by running the ipconfig command in a Command Prompt window. You’ll see your IP address in the IPv4 Address row beneath the name of your connection.
image
If you’re using Ubuntu or another Linux distribution, check out our guide to finding your IP address on Ubuntu.

Finding Your Public IP Address

The easiest way to find your public IP address is by asking a website, since that website sees your public IP address and can tell it to you – for example, you can search for what is my ip or what is my ip address on Google. Google will display your public IP address.
image
You can also access your router’s administration page to find this information. This page displays your public IP address and other information about your Internet connection. Different routers have different administration page layouts and different default local IP addresses – consult your router’s manual if you need more information.
image

Unlike street addresses, IP addresses aren’t necessarily fixed. Your Internet service provider may regularly assign you a new IP address, just as your router may occasionally assign your devices new IP addresses.

Monitor your CPU temperature

The most important temperature to measure in your computer is the processor, or CPU. Core Temp is a simple, lightweight app that runs in your system tray and monitor’s the temperature of your CPU without cluttering it up with other stuff. It offers a few different options so you can customize it to your tastes, and even works withother programs like Rainmeter.
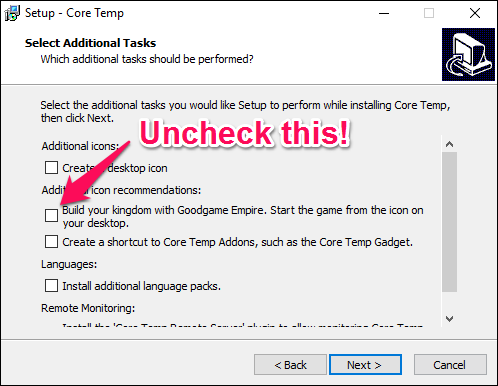
Download Core Temp from its home page and install it on your computer. Be very careful to uncheck the bundled software on the third page of the installation! This was unchecked by default for me, but other users have noted that it is checked by default for them.
coretempcrapware
When you run it, it will appear as an icon or series of icons in your system tray showing the temperature of your CPU. If your CPU has multiple cores (as most modern CPUs do), it will show multiple icons–one for each core.
screenshot.1
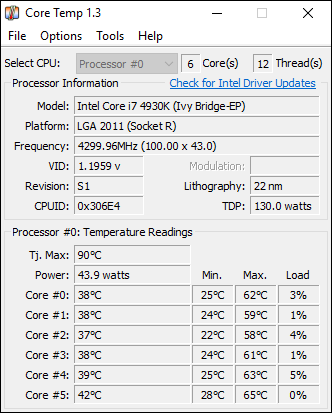
Right-click on the icon to show or hide the main window. It will give you a bunch of information about your CPU, including the model, speed, and the temperature of each of its cores.
coretempmain
Take particular note of the “TJ. Max” value–this is the highest temperature (in Celsius) at which the manufacturer has rated your CPU to run. If your CPU is anywhere near that temperature, it is considered overheating. (Usually it’s best to keep it at least 10 to 20 degrees lower than that–and even then, if you’re anywhere close, it usually means something is wrong unless you’ve overclocked your CPU.)
For most modern CPUs, Core Temp should be able to detect the Tj. Max for your specific processor, but you should look your specific processor online and double check. Every processor is a little different, and having an accurate Tj. Max value is very important, as it ensures you’re getting the correct temperature readings for your CPU.
Head to Options > Settings to configure some of Core Temp’s more useful features. Here are a few settings we recommend looking at:
  • General > Start Core Temp with Windows: You can turn this on or off; it’s up to you. Turning it on will allow you to monitor your temperatures at all time without having to remember to start it up. But if you only need the app occasionally, it’s okay to turn this off.
  • Display > Start Core Temp minimized: You’ll probably want to turn this on if you have “Start Core Temp with Windows” on.
  • Display > Hide Taskbar Button: Again, if you’re going to leave it running all the time, this is good to turn on so it doesn’t waste space on your taskbar.
  • Notification Area > Notification Area Icons: This allows you to customize how Core Temp appears in your notification area (or system tray, as its commonly called). You can choose to display just the app’s icon, or display the temperature of your CPU–I recommend the “highest temperature” (instead of “all cores”, which will show multiple icons). You can also customize the font and colors here.
screenshot.3
If the icon is only appearing in the pop-up tray and you want to see it at all times, just click and drag it onto your taskbar.
screenshot.7
If you decide to show the temperature in the notification area, you may want to change the Temperature Polling Interval in the General tab of Core Temp’s settings. By default, it’s set to 1000 milliseconds, but you can move it higher if the blinking numbers annoy you. Just remember the higher you set it, the more time it’ll take for Core Temp to notify you if your CPU is running hot.
Core Temp can do a lot more than this–you can head to Options > Overheat Protection to have your computer alert you when it reaches its maximum safe temperature, for example–but these basics should be all you need to keep an eye on your CPU temperatures.

For Advanced Monitoring Across Your Entire System: HWMonitor

Generally, your CPU temperatures are going to be the most important temperatures to monitor. But, if you want to see temperatures across your system–motherboard, CPU, graphics card, and hard drives–HWMonitor gives you that and much more.
Download the latest version from the HWMonitor home page–I recommend the ZIP version, which doesn’t require installation, though you can also download the full setup version if you want. Start it up, and you’ll be greeted with a table of temperatures, fan speeds, and other values.
screenshot.2
To find your CPU temperature, scroll down to the entry for your CPU–mine, for example, is an “Intel Core i7 4930K”–and look at the “Core #” temperatures in the list.
(Note that “Core Temperature” is different than “CPU Temp”, which will appear under the motherboard section for some PCs. Generally, you’ll want to monitor the Core temperature. See our note below about AMD temperatures for more info.)
screenshot.3
Feel free to poke around and see temperatures for other components in your system, too. There isn’t much else you can do with HWMonitor, but it’s a good program to have around.

A Note on AMD Processor Temperatures

Monitoring temperatures for AMD processors has long puzzled computer enthusiasts. Unlike most Intel processors, AMD machines will report two temperatures: “CPU Temperature” and “Core Temperature”.
“CPU Temperature” is an actual temperature sensor inside the CPU’s socket. “Core Temperature”, on the other hand, isn’t really a temperature at all. It’s an arbitrary scale measured in degrees celsius designed to, in a way, mimic a temperature sensor.
Your BIOS will often show the CPU Temperature, which may differ from programs like Core Temp, which show Core Temperature. Some programs, like HWMonitor, show both.
CPU Temperature is more accurate at low levels, but less so at high levels. Core Temperature is more accurate and precise when your CPU get hot–which is when temperature values really matter. So, in almost all cases, you’ll want to pay attention to Core Temperature. When your system is idle, it may show impossibly low temperatures (like 15 degrees celsius), but once things heat up a bit, it will show a more accurate–and useful–value.

What to Do If You Don’t Get a Reading (or Temperatures Look Really Wrong)

In some cases, you may find that one of the above programs doesn’t quite work. Maybe it doesn’t match up with another temperature-monitoring program, maybe it’s absurdly low, or maybe you can’t get a temperature at all.
There are a lot of reasons this could happen, but here are a few things to check:
  • Are you looking at the right sensors? If two programs don’t agree, it’s possible–especially on AMD machines–that one program is reporting the “Core temperature” and one is reporting the “CPU temperature”. Make sure you’re comparing apples to apples. Core temperature is usually what you want to monitor, as we mentioned above.
  • Make sure your programs are up to date. If you’re using an old version of Core Temp, for example, it may not support your CPU, in which case it won’t provide an accurate temperature (or possibly won’t even provide a temperature at all). Download the latest version to see if it fixes the problem. If you have a very new CPU, you may need to wait for an update to the program.
  • How old is your computer? If it’s more than a few years old, it may not be supported by programs like Core Temp.
We could write a book about monitoring CPU temperatures, but in the interest of keeping this easy to follow, we’ll leave it at that. Hopefully, you can get a general estimate of how well your CPU is being cooled.

Monitoring your temperatures is good, and something everyone should check on once in a while. But if your computer is regularly overheating, there’s probably a deeper cause that you need to look into. Open up the Task Managerand see if there are any processes using your CPU, and stop them (or figure out why they’re out of control). Make sure that you aren’t blocking any of the vents on your computer, especially if it’s a laptopBlow the vents out with compressed air to make sure they aren’t filled with dust and dirt. The older and dirtier a computer gets, the harder the fans have to work to keep the temperature down–which means a hot computer and very loud fans.

Top 10 browsers with speed , battery saving and performance

The Best Overall for Most People: Google Chrome

Overall, we prefer Google Chrome. To start, it just feels snappier than other browsers like Firefox and Edge, although Edge has improved somewhat since Windows 10’s release. Google owns Chrome and uses it as a platform to improve and advance the web in general, so Chrome often gets new features before other browsers. It also has some unique features–you can only cast to a Chromecast from the Chrome browser, for example.
Chrome generally comes out on top in benchmarks, showing it’s the speediest browser as well (see the last section of this article). Microsoft Edge is catching up with Chrome and may top it in a benchmark or two, but Edge isn’t nearly as feature-filled.
If Chrome doesn’t have a feature you want, well, you’re in luck: it has built up a massive catalog ofextensions over the last few years, so any feature you want to add, you probably can. Chrome is also available for Windows, macOS, Linux, iOS, and Android–in addition to Chromebooks, of course. This means you can synchronize your bookmarks, saved tabs, and even passwordsacross all your devices to access them from anywhere.
Chrome certainly isn’t perfect, of course. It isn’t the most battery-efficient browser for laptops or the most customizable tool for power users. In addition, it uses an awful lot of RAM, which may make it feel slow on older computers. But, that RAM usage is generally used for useful features and speed improvements on modern computers (remember, used RAM is good), so this isn’t as much of a con as most people would have you believe. It’s mostly only a problem on older or low-powered machines.
Plus, Google is getting pretty good at stripping unnecessary cruft from Chrome. They’ve trashed of little-used features like the Chrome app launchernotification center, and Chrome apps. Google seems like it’s taking Chrome in the right direction, simplifying it and focusing on battery life improvements while continuing to add powerful features for developers. No matter who you are, Chrome will probably serve you well.

The Best for Battery Life: Microsoft Edge (Windows) and Apple Safari (Mac)

While Chrome has its strengths, long battery life is not one of them. If find yourself struggling to keep your laptop alive between charges, you might be able to do better.
Microsoft and Apple, as the companies that make Windows and macOS, respectively, really want to boast high battery life estimates for their computers. All these numbers are measured usingEdge on Windows and Safari on macOS. Edge and Safari are just more optimized for battery life.
On a Windows PC, the Microsoft Edge web browser offers noticeably longer battery life than Chrome. On a Mac, Apple’s Safari browser offers hours more. Chrome has made some strides recently–and it’s good to see Google making an effort–but Edge and Safari are still ahead.
This doesn’t mean all laptop users should automatically pick Edge or Safari. Rather, it means they’re worth a try if you don’t need advanced features, and really need every hour of battery you can get in that moment. Edge and Safari still don’t measure up to Chrome in terms of feature.s
For example, both Edge and Safari offer far fewerextensions. They also can’t sync to the same amount of platforms–Edge can only sync between Windows 10 and Windows Mobile 10, while Safari can only sync between macOS and iOS. Chrome also runs on older versions of Windows and macOS, where you can’t run Microsoft Edge or the latest version of Safari.
Edge can also be a little flaky because it’s based on Windows 10’s new Universal Windows Platform (UWP). Microsoft still has work to do on UWP. Edge isn’t as bad as it was when Windows 10 was released, but the interface still sometimes seems oddly slow.

The Best for Customization: Mozilla Firefox

Mozilla positions Firefox as the only browser not controlled by a major corporation; one that’s responsive to the needs of its users rather than the needs of a big company that wants to lock you into its platform. That’s a compelling narrative, but some of Firefox’s moves–like the choice of Yahoo! as its default search engine, and the forced integration of the Pocket read-it-later service–undermine it. We like Pocket, and we understand that Mozilla needs to make money to stay alive, but these forced changes end up being annoying. People shouldn’t be forced to use about:config if they want to disable them.
Unfortunately, Firefox is still behind Chrome, Edge, and Safari in critical ways. It doesn’t offer the same multi-process architecture and security sandboxing features other browsers offer. The long-delayed Electrolysis project, which will add multi-process features, is still unfinished. This makes the browser less responsive, especially on CPUs with multiple cores, and means Firefox is less protected against security vulnerabilities. Firefox is also consistently the slowest browser in benchmarks.
That said, Firefox is still the most customizable of the lot. Its add-on framework is the most powerful. For example, you can’t easily get tree-style tabs in a vertical sidebar on Chrome, Edge, or Safari–but you can do this on Firefox by quickly installing an add-on. If there’s something you can’t do with a Chrome extension, you can probably do it with a Firefox add-on. Though a lot of options are available in about:config, so in some cases, you may not even need an add-on. Of course, most people don’t need these powerful customization options. But if you do, Firefox is the place to get them.
Mozilla is currently working on a new add-on framework for Firefox that will be more Chrome-like, so it remains to be seen if Firefox will stay this customizable. Mozilla does promise that it will extend the add-on framework to allow popular add-ons to continue to function, even if they couldn’t on Chrome. There’s reason for some optimism here, but we wouldn’t use Firefox ourselves until Electrolysis is done.

Benchmarked: Which Browsers Are the Fastest?

We know people like seeing raw benchmarks, so we chose to benchmark the latest browsers on both Windows 10’s Anniversary Update andmacOS Sierra.
Just keep in mind: Benchmarks don’t tell the entire story.  Modern browsers are all within spitting distance of each other, and a browser might underperform on benchmarks but perform better in day-to-day use. Features like Google Instant or Chrome’s pre-rendering will make a browser faster in day-to-day use, but won’t show up in benchmarks, for example. So we don’t recommend choosing your browser based on benchmarks alone.

Raw Benchmark Scores: Windows 10 Anniversary Update

On Windows 10, Chrome appears to be the fastest browser with Edge in second place. Edge does pull ahead of Chrome on the Octane 2.0 benchmark, however. Firefox is consistently in last place.
Jetstream 1.1 (Bigger Scores Are Better)
  1. Chrome 53: 207.81
  2. Microsoft Edge 38: 201.14
  3. Firefox 49: 167.10
Kraken 1.1 (Smaller Times Are Better)
  1. Chrome 53: 861.9ms
  2. Microsoft Edge 38: 1082.6ms
  3. Firefox 49: 1174.9ms
Octane 2.0 (Bigger Scores Are Better)
  1. Microsoft Edge 38: 35326
  2. Chrome 53: 34107
  3. Firefox 49: 30987

Raw Benchmark Scores: macOS Sierra

On macOS Sierra, Chrome appears to be the fastest browser with Safari in second place. Firefox is consistently in last place.
Jetstream 1.1 (Bigger Scores Are Better)
  1. Chrome 53: 135.47
  2. Safari 10: 99.407
  3. Firefox 49: 95.411
Kraken 1.1 (Smaller Times Are Better)
  1. Chrome 53: 1297.6ms
  2. Safari 10: 1299.6ms
  3. Firefox 49: 1534.6ms
Octane 2.0 (Bigger Scores Are Better)
  1. Chrome 53: 22978
  2. Safari 10: 22084
  3. Firefox 49: 21643
No one browser will be on top forever. The browser wars will continue, and competition is constantly making every browser better. Competition is forcing Google to improve Chrome’s battery life, Mozilla to make Firefox multi-process, and Microsoft and Apple to keep improving Edge and Safari to keep improving their browsers with new features.